Parmesan-Cheddar Squash Casserole


Summer means beach and fresh vegetables! I particularly love tomatoes and summer squash. I am also a big cheese lover so this recipe from nancycreative.com. was a must try.

How can you go wrong with summer yellow squash, 2 types of cheese, and fresh herbs? I mean really...this is a no-brainer for sure.

So here we go....

Assemble your ingredients. BTW, notice the nice big bunch of fresh herbs here?  Well, that was supposed to be parsley. I noticed too late that it was cilantro.  Dang. 


I somehow left the Sour Cream out of this picture. Don't leave it out of your casserole!


PARMESAN-CHEDDAR SQUASH CASSEROLE
  • 4 pounds yellow squash, sliced (1 pound of squash yields about 2 cups sliced, so you’d need about 8 cups)
  • 4 Tbsp. butter, divided
  • 1 large sweet onion, finely chopped
  • 2 garlic cloves, minced
  • 2 1/2 cups soft breadcrumbs, divided
  • 1 1/2 cups shredded Parmesan cheese, divided
  • 2 cups (8 oz.) shredded Cheddar cheese
  • 1/2 cup chopped fresh chives
  • 1/2 cup minced fresh parsley
  • 1 cup sour cream
  • 1 tsp. salt
  • 1 tsp. pepper
  • 2 large eggs, lightly beaten
  • 1/4 tsp. garlic salt
In large skillet, cook squash, covered in boiling water, for 8-10 minutes or until tender. Drain well and remove squash from skillet; gently press squash between paper towels to take out remaining moisture and set aside. Then, in same large skillet, melt 2 Tbsp. butter over medium-high heat; add onion and garlic, and saute 5 to 6 minutes or until tender. Remove skillet from heat; stir in squash, 1 cup breadcrumbs, 3/4 cup Parmesan cheese, and the other remaining ingredients, except for the garlic salt. Spoon into a lightly greased 13×9-inch baking dish.


Melt remaining 2 Tbsp. butter and stir with remaining 1 1/2 cups breadcrumbs, 3/4 cup Parmesan cheese, and garlic salt. Sprinkle mixture evenly over the top of the casserole. (If you want, you can also sprinkle another 1/2 cup of Cheddar cheese on the top to make it extra cheesy.) Bake at 350 degrees for 35-40 minutes, or until set. This makes 8-10 servings.


Now for the best part!


BTW, did I mention how good the kitchen smelled while this was cooking?


Overnite Oats in a Jar


I have been aware lately that I don't eat a very healthy diet. When I was working I would usually skip breakfast and sometimes lunch and then eat everything in sight when I got home. Not a good thing.

Now that I'm home most every day I have been trying to eat a healthy breakfast. I don't really care for cold cereal in the mornings although I love it for an evening snack. I love hot oatmeal in the winter but not in the summer. And I'm not gonna heat up a skillet just to cook for me. I saw this recipe on Camp Wander and it looked like just what I needed. Easy to make, I can make it ahead of time, I could make several and store in the refrigerator, and I love oatmeal.


So here I am making it for the very first time.

Assemble the ingredients. I have to stop here and tell you about my honey. I have a friend whose hobby is beekeeping! She recently gave me this wonderful jar of her "liquid gold".  And the berries were from my freezer picked just this summer. Yummmm.

I made just a couple of small changes to Camp Wander's recipe ....

Single serving:

1/2  cup rolled oats
1/2  cup Honey Greek Yogurt
2/3  cup milk, or coconut milk or almond milk etc.
1 teaspoon honey
1/4 teaspoon nutmeg or cinnamon
teeny pinch of salt
1/4  cup blueberries
1/4  cup strawberries or raspberries


Fill a pint jar and refrigerate overnight.  That's it!   


Ready to eat...I was actually suprised at how good it tastes.  I had to stop eating so I could take the pictures! This is gonna be a regular at my house.

DIY Body Scrub

I read this post by One Good Thing on how to make my own Body Scrub. I have never been one who does a lot of self pampering. I couldn't justify the money or the time. Well now I'm retired and this scrub was inexpensive to make. So there went my reasons.


I should use a body scrub, after all I am a beach girl. I love the sun, the sand, and the salt water but they can be rough on the skin.  I looked at the ingredients and I actually had everything I needed to make one of the scrubs right then. So I did.

So now I had my homemade scrub...now what? I had never used a body scrub before. Seemed to me it needed to be done in a shower as I was thinking it would get messy. But would I bathe with soap before or after? After didn't make sense as I would wash off all the moisturizing oils. So I showered with soap and rinsed off. Then I started with the scrub. I quickly discovered I needed to turn off the water first as it dissolved the scrub faster than I could exfoliate with it. Are you laughing at me yet?

I was surprised at how good it felt and immediately wished I had some essential oils to add for fragrance. Plus essential oils have their own healing qualities. I felt so soft and silky afterwards...I was in love!

Now I am on a mission to make several of these recipes and to use one of them at least once a week. I'm thinking of the one with coconut oil and lavender for evening use. And one with lemon for mornings or when going out. (Lavender calms and sooths while lemon invigorates).


Here is a very basic recipe.

  1. Salt or sugar. It is my understanding that sugar gives a gentler scrub while salt creates a more invigorating scrub. beauty.about.com says,
    "Just make sure to choose a sugar or salt that has small granules that won't tear at skin. A basic table salt or sugar works wonderfully. If you have super sensitive skin, you might opt for a dark brown sugar."
2.   Oil...half as much as the salt or sugar.  Suggestions are olive oil, coconut oil (prefer organic extra virgin), almond oil, safflower, or even vegetable.  So if you use 1/2 cup sugar you would use 2 Tablespoons oil. I had baby oil on this list but my sister the Esthetician gave that a big thumbs down.

3.    A few drops of essential oils for healing qualities and fragrance. There are so many to choose from but lavender and lemon seem to be the most popular. You can also use vanilla.

Another variation is to cut the oil to 1 Tablespoon per 1/2 cup of salt or sugar and add 2 Tablespoons lemon juice for a Citrus Scrub. This one is def on my list.


This is how to actually use a body scrub at home. Again from beauty.about.com.

  1. Now onto the bath itself. I find scrubs work best on dry skin. Step into a bath tub and put on loofah mitts. I like the exfoliating gloves that you get in health food stores. They really scrub your skin good. If you don't have a bath mitt, don't worry, you can use your hands.
  2. Take a spoonful of the mixture into your palms or your gloves and then rub the mixture all over your body in a circular motion. For tougher areas such as the knees, soles and elbows, spend extra scrubbing time or cut a lemon in half and pour sea salt on the halves, scrubbing your soles, elbows and knees with the lemon. On places like the chest, neck, and stomach, where the skin is thinner, take it easy with the scrubbing and instead use cleanser on a washcloth to exfoliate. If you feel the salt is too harsh on your skin, rinse off the bath mitts and then spoon only the oil onto the mitts to continue.
  3. Once entire body is scrubbed well, rinse thoroughly.
  4. Pat skin dry. You should be good and cleansed. The salt (or sugar) should have exfoliated your skin nicely with the help of the loofah and the oil should leave skin soft and moisturized. You shouldn't even need to follow the bath with a moisturizer.
  5. The only bad part about this scrub is the oil can build up on the bathtub bottom. Make sure to clean it up so the next person who gets in doesn't slip


Just found another GREAT variation over at Camp Wander.

Better Than Pill Pockets

You may have already read on here somewhere that I have three dogs. Two of them have Cushing's Disease and have to take meds everyday to keep it in check.

I have tried using Pill Pockets but they didn't really work very well for me. This idea is less expensive and works way better!

Fully cooked frozen meatballs!! (Thawed of course)

I get whatever brand is on sale or the least expensive at the time. Each morning I put two meatballs in the microwave for 12 seconds on high. Be careful because the inside can get very hot and you don't want to burn the inide of your dogs mouth.

I cut each one in half and shove the pill or capsule inside. My dogs think they are getting their daily treat!
I use 1/2 meatball for each capsule. Besides the very expensive Vetoryl for the Cushing's disease I also have one dog on another capsule right now so I am giving 3 capsules a day using 1 1/2 meatballs. I use the remaining half for the dog who doesn't get any meds so she will get a treat as well.


Gardner's Moisture by Camp Wander


Gardener's Moisture from Camp Wander is the best ever hand restorer! My hands take a beating so I was sooo glad to give this a try.


The fragrance is amazing and it left my hands feeling so soft.


Highly recommend you give it a try. Just send an email to rebecca@campwander.com or go to http://campwander.blogspot.com/2012/04/diy-skin-care-for-gardeners-everyone.html to make it yourself. Only $14.99 including shipping!

Key Lime Poke Cake


You know me....I like easy. I don't want to spend all day in the kitchen or get frustrated trying to cook something good. So when I saw this recipe on bettycrocker.com I knew I had to try it.
 
It was fairly easy and used some prepacked ingredients which of course save time. BTW, I served this up to some of my girlfriends last night and it was a hit!
 
So here we go...
 
Heat oven to 350°F (325°F for dark or nonstick pan). Spray bottom only of 13x9-inch pan with baking spray with flour. I don't use the sprays much so I greased and floured the bottom of the pan.
 
In large bowl, beat cake ingredients with electric mixer on low speed 30 seconds, then on medium speed 2 minutes, scraping bowl occasionally. Pour into pan.


Bake 27 to 33 minutes or until toothpick inserted in center comes out clean. Cool 5 minutes. With handle of wooden spoon (1/4 to 1/2 inch in diameter), poke holes almost to bottom of cake every 1/2 inch, wiping spoon handle occasionally to reduce sticking.

 
In medium bowl, stir together filling ingredients (mixture will thicken). Pour over cake; spread evenly over surface, working back and forth to fill holes. (Some filling should remain on top of cake.) Refrigerate 1 hour.
 
 
Spread frosting over cake; sprinkle with lime peel. Garnish as desired. Store loosely covered in refrigerator.


Ingredients
 
Cake
1 box Betty Crocker® SuperMoist® white cake mix
1 1/4 cups water
1 tablespoon vegetable oil
4 eggs
Key Lime Filling
1 can (14 oz) sweetened condensed milk (not evaporated)
3/4 cup whipping cream
1/2 cup Key lime juice or regular lime juice
1 teaspoon grated lime peel
4 drops yellow food color
1 drop green food color
Frosting
1 container (12 oz) Betty Crocker® Whipped vanilla frosting
2 teaspoons grated lime peel
Garnish, If Desired
Fresh strawberries
Key lime slices
Lemon leaves
Instructions
  1. Heat oven to 350°F (325°F for dark or nonstick pan). Spray bottom only of 13x9-inch pan with baking spray with flour.
  2. In large bowl, beat cake ingredients with electric mixer on low speed 30 seconds, then on medium speed 2 minutes, scraping bowl occasionally. Pour into pan.
  3. Bake 27 to 33 minutes or until toothpick inserted in center comes out clean. Cool 5 minutes. With handle of wooden spoon (1/4 to 1/2 inch in diameter), poke holes almost to bottom of cake every 1/2 inch, wiping spoon handle occasionally to reduce sticking.
  4. In medium bowl, stir together filling ingredients (mixture will thicken). Pour over cake; spread evenly over surface, working back and forth to fill holes. (Some filling should remain on top of cake.) Refrigerate 1 hour.
  5. Spread frosting over cake; sprinkle with lime peel. Garnish as desired. Store loosely covered in refrigerator.

DIY Twin Adirondack Chairs


We saw a Twin Adirondack Chair for sale at a local hardware store and loved it. It was unpainted wood and cost about $400.00! We decided to check and see if we could find plans for one online and build one ourselves. Bingo! We found this site by Woodcraft.com. They have soooo many plans to choose from, toys, holiday items, furniture, and of course Adirondack chairs. We ordered the plans, some transfer paper, and a package of hardware for $37.29 / $42.28 with tax and shipping. This is what arrived in the mail.


Inside we found: Instruction book, hardware packet, transfer paper, 2 sets of patterns (all for the same chair).


The instructions told us exactly what to buy and were very easy to follow. The pattern pieces reminded me of my old sewing days. We were off to a happy start.


Of course, you do have to have one of these! As well as a miter saw.


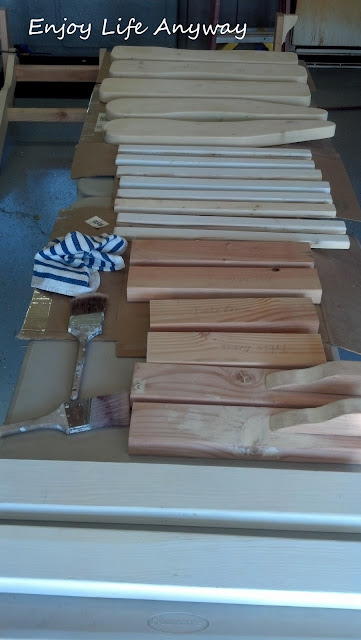
After all the pieces were cut they were sanded and primed we began assembly. Our good friends at Sherwin-Williams Paint recommend this deck sealer for the primer as we did not use salt treated lumber.


We primed all the pieces before assembly and then assembled all except the slats for the chair seats. We decided it would be too hard to get inbetween them for painting so we painted them separately. Here you see the assembled pieces and the beginning of the painting.


This is the one of the 4 pieces that make the chair backs adjustable! They will actually lay all the way down if we want them to.


The turquoise blue paint is a whole nother (that actually is a word here) story. I had purchased a can of what I thought was white exterior high gloss paint for another project. When I began using it I noticed something wasn't right. It wouldn't cover anything and was almost clear when painted on. Then I looked at the can again and realized I had gotten a can of base paint that required tinting. I had gone back to the store for the paint I originally intented to buy but now I had this can of untinted paint that I was not going to waste. So we took it back to the store and asked to have it tinted and we picked out a color. The clerk made a mistake and the paint came out a very dark and different color than we had chosen. Since some of the paint had been used he added as much white paint to it as he could and we ended up with the color you see. I actually love it! Its sort of a beachy turquoisy blue.


New Bicycle!

My dear sweet hubby surprised me with this today. I am thrilled!   I had looked at it at Walmart and it was on sale for just $88.00.


I took it out for a trial "spin". Rode just a few blocks and really liked it. The seat is comfortable and I didn't even have to adjust the height of it or the handlebars. I like the old fashioned bikes...no gears, big wheels, comfy seat.


So here are the specifics.
  • Steel cantilever cruiser frame is strong and dependable
  • Coaster brake and extra wide comfort seat with heavy duty springs provides an easy comfortable ride
  • Painted steel fenders, alloy rims and alloy quick release seat posts
  • Wide sweep handlebar and white wall tires
 

2012 Declutter Calendar

I love this idea! So simple... A calender with a chore a day to keep our homes and lives organized.


Click here for printable calenders to keep you on track!


You can even sign up for free declutter calendar and get weekly simplicity tips by email.  Sweeeeet...